Step 1
Determine stud placement pattern before installation (See Placement Patterns ). For this demonstration, we have chosen the standard pattern.
Step 2
Slide a stud into the prongs of the Grip Studs™ installation tool using extra force if necessary to ensure the stud is firmly positioned.
Step 2 Image
Step 3 Image
Step 3
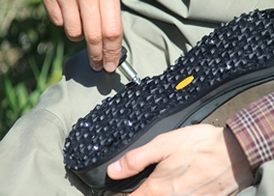
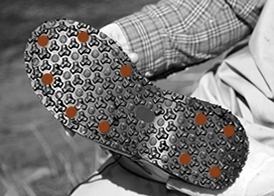
If your soles have pre-drilled holes for studs, try to conform to the suggested placement pattern in using the existing pilot holes. For most other sole types, position studs between the thick tread knobs, matching the placement pattern as closely as possible. For soles with tight tread patterns that make placement possible only on top of the knobs, use Model #1100 ONLY, matching the placement pattern as closely as possible.
Step 4 Image
Stud ComparisonStep 4
Apply pressure straight down while slowly rotating the stud into the sole. Continue to rotate until the tool prongs are embedded into the sole. Make sure the penetration area is fully embedded into the sole as shown in the illustration at right. Remove the tool from the installed stud.
Step 5 Image
Step 5
Repeat procedure with the remaining studs. Put your wader shoes on, and step into the water with awesome traction. Go fish!


Step 5
To remove studs, simply unscrew with installation tool.

CAUTION: By the way, our studs afford awesome traction in streambeds because of their tungsten carbide impact tips, but those same tips can damage truck beds, garage and indoor flooring, and scratch the inside of drift boats. We store our studded boots on a carpet remnant to protect the back of our truck and garage shelves from scratches.